테스트 피라미드 3단계의 가장 밑바탕이되는 unit test를 먼저 시작한다.
Jest
- 자바스크립트에서 주로 사용되는 테스트 라이브러리이다.
- create-react-app으로 react 프로젝트를 생성시 함께 설치되는 라이브러리이기 때문에 React 환경의 테스트를 앞서서 vailla javascript를 Jest로 테스트한다.
Jest 환경설정
Jest는 javascript 환경에서 사용해야하기 때문에 node js을 사용할 수 있도록 npm 환경을 설정한다.
1
npm init --yes
npm 환경설정이 완료되면 package.json파일이 생성되고
Jest 를 설치한다.
1
npm install jest --global
jest 시작 + jest.config.js 파일 설치
1
jest --init
jest 함수의 사용법을 쉽게 파악하기 위해 jest 타입을 설치한다. jest타입을 설치하면 package.json에 @types/jest dependency가 설치되고 jest관련 함수를 사용하고 ctrl + click(cursor)를 누르면 사용법을 확인할 수 있다.
1
npm install @types/jest
package.json에 jest script 추가
1
2
3
4
"scripts": {
    "test": "jest",
    "clear_jest": "jest --clearCache"
},
npm run test로 jest를 실행,npm run clear_jest로 기존의 jest 수행결과 cache를 삭제한다.
함수 테스트
함수 테스트를 위해 mock 함수을 사용한다.
Mock functions are also known as “spies”, because they let you spy on the behavior of a function that is called indirectly by some other code, rather than only testing the output. You can create a mock function with jest.fn(). If no implementation is given, the mock function will return undefined when invoked.
mock은 ‘스파이’라고 알려져있다. mock은 결과값을 테스트하는게 아니라 다른 함수로부터 간접적으로 불리는 함수의 행동을 감시한다. jest.fn()로 mock 함수를 만들 수 있고 implement 가 없으면 undefined를 return 한다.
mock은 함수를 태스트하기 위해 가짜(mock)으로 함수를 대체하는 기법을 말한다.
일반적으로 테스트하려는 코드가 의존하는 부분을 직접 생성하기가 부담스러운 경우 mocking이 사용된다.
check.js
1
2
3
4
5
6
7
8
9
function check(predicate, onSuccess, onFail) {
  if (validate()) {
    onSuccess("yes");
  } else {
    onFail("no");
  }
}

module.exports = check;
함수를 정의하고 테스트하기 위해 export 설정을 한다.
check.test.js
check.js 테스트하기위해 먼저 check.js를 import한다.
1
const check = require("../check");
한 함수에서 다양한 상황을 테스트하기 위해 describe로 묶는다. 모든 테스트는 ‘check’라는 이름으로 묶인다.
1
2
3
describe("check", () => {
    ...
});
describe내부에서 각 테스트별로 테스트 시작전에 공통적으로 불리는 코드는 beforeEach()로 묶어서 재사용성을 높인다.
it 혹은 test로 테스트할 상황을 정의하고 첫번째 인자로 상황을 정의하는 문장을 , 두번째 인자는 테스트 코드 함수를 받는다.
1
2
3
4
5
6
7
8
9
10
11
12
13
14
15
16
17
18
describe("check", () => {
  let onSuccess;
  let onFail;

  beforeEach(() => {
    onSuccess = jest.fn();
    onFail = jest.fn();
  });


  it("should call onSuccess when validate is true", () => {
    ...
  });

  it("should call onFail when validate is false", () => {
    ...
  });
});
각 테스트 별로 check함수를 부르고 expect를 통해 기대하는 결과를 작성한다.
테스트 별로 기대하는 결과는 expect 함수의 matcher를 사용해 테스트에 기대하는 결과값을 비교한다.
1
2
3
4
5
6
7
8
9
10
11
12
13
14
15
16
17
18
19
20
21
22
23
24
25
26
//it 혹은 test로 테스트할 상황을 정의하고 첫번째 인자로 상황을 정의하는 문장을 , 두번째 인자는 테스트 코드 함수를 받는다.
it("should call onSuccess when validate is true", () => {
  check(() => true, onSuccess, onFail);

  //expect(onSuccess.mock.calls.length).toBe(1);
  expect(onSuccess).toHaveBeenCalledTimes(1);

  //expect(onSuccess.mock.calls[0][0]).toBe('yes');
  expect(onSuccess).toHaveBeenCalledWith("yes");

  //expect(onFail.mock.calls.length).toBe(0);
  expect(onFail).toHaveBeenCalledTimes(0);
});

it("should call onFail when validate is false", () => {
  check(() => false, onSuccess, onFail);

  //expect(onFail.mock.calls.length).toBe(1);
  expect(onFail).toHaveBeenCalledTimes(1);

  //expect(onFail.mock.calls[0][0]).toBe('no');
  expect(onFail).toHaveBeenCalledWith("no");

  //expect(onSuccess.mock.calls.length).toBe(0);
  expect(onSuccess).toHaveBeenCalledTimes(0);
});
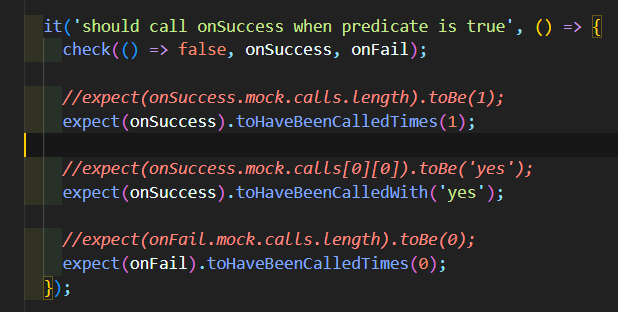
fail하도록 수정한 코드

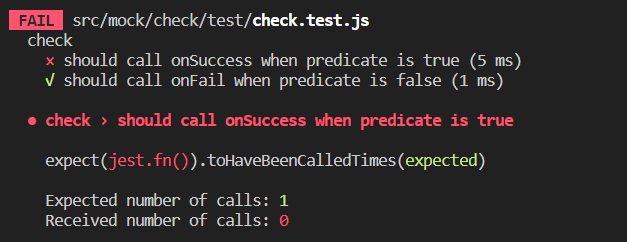
fail 결과 캡쳐화면

테스트에서 기대하는 결과가 나오지 않으면 fail과 함께 should call onSuccess when predicate is true테스트에서 틀렸다는 것을 확인할 수 있다.
테스트 코드는 의도된 대로 작성되었지만 구현 코드가 잘못되어 실패했다면 테스트가 통과할 때까지 구현 코드를 수정한다.
클래스 테스트
user_service.js
1
2
3
4
5
6
7
8
9
10
11
12
13
14
15
16
class UserService {
  constructor(userClient) {
    this.userClient = userClient;
    this.isLogedIn = false;
  }

  login(id, password) {
    if (!this.isLogedIn) {
      return this.userClient
        .login(id, password)
        .then((data) => (this.isLogedIn = true));
    }
  }
}

module.exports = UserService;
기존의 코드는 user_service.js 내부에 fetch 함수로 데이터를 받아왔다. 하지만 네트워크에 의존하는 코드는 mock 또는 stub으로 따로 테스트를 하기위해 UserClient클래스로 분리한다. 그리고 UserService 클래스에서는 userClient에 분리된 함수가 네트워크연결되어 데이터를 받아 올 경우 login 상태를 true로 변경한다.
user_client.js
1
2
3
4
5
6
7
8
class UserClient {
  login(id, password) {
    return fetch("http://example.com/login/id+password") //
      .then((response) => response.json());
  }
}

module.exports = UserClient;
UserClient 클래스 내부에 비동기 login함수를 만들고 데이터를 받아온다.
user_service.test.js
1
2
3
4
5
6
7
8
9
10
11
12
13
14
15
16
17
18
19
20
21
22
23
24
25
26
27
28
29
30
31
32
33
34
35
const UserService = require("../user_service");
const UserClient = require("../user_client");
jest.mock("../user_client");

describe("UserService", () => {
  const login = jest.fn(async () => "success");
  //UserClient에서 login함수를 불러온다.
  UserClient.mockImplementation(() => {
    return {
      login,
    };
  });

  let userService;

  beforeEach(() => {
    userService = new UserService(new UserClient());
    // login.mockClear();
    // UserClient.mockClear();
    //jest config clearMocks: true 설정을 해놔서 mockClear를 안해도 됨
  });

  it("calls login on UserClient when tries to login", async () => {
    await userService.login("abc", "abc");
    expect(login).toHaveBeenCalledTimes(1);
  });

  it("should not call login() on UserClient again if already logged in", async () => {
    //기존에 로그인 되어있다면  로그인을 시도해도 login 함수가 한번 불려진다.
    await userService.login("abc", "abc");
    await userService.login("abc", "abc");

    expect(login).toHaveBeenCalledTimes(1);
  });
});
1
2
3
4
5
6
7
8
9
10
11
12
13
14
15
16
module.exports = {
  // All imported modules in your tests should be mocked automatically
  // automock: false,

  // Stop running tests after `n` failures
  // bail: 0,

  // The directory where Jest should store its cached dependency information
  // cacheDirectory: "C:\\Users\\jooheek\\AppData\\Local\\Temp\\jest",

  // 모든 테스트가 시작하기 전에 mock call, instance, context, result를 모두 리셋해주는 설정이다.
  clearMocks: true,

  // 테스트 가 얼마나 코드를 cover하는지 수치를 보여주는 설정이다.
  collectCoverage: false,
};
jest.config.js에서 테스트 간의 mock함수 독립성을 위해 clearMocks 설정을 true로,
테스트 결과를 간결하게 보기 위해 npm run test하면 항상 나왔던 프로젝트 당 coverage를 false로 설정한다.
💡참고

Comments powered by Disqus.